Christine Bauer-Ramazani
1. My
own important tips for teaching with PPT (that I have not found in any of the
guides below):
- Change the settings for advancing the
slideshow depending on HOW YOU WILL USE IT.
For elicitation in teaching:
- Have a printout of your slides with notes
in hand when you teach so that you have all of the items on the slide in
front of you.
- When authoring, use
Custom Animation to select the appropriate
settings. Purpose: to discuss the item first and elicit answers from
the audience (students) before showing the item on mouse click for
confirmation.
- Check the Sound
and select No Sound from the drop
down menu, UNLESS there the content calls for any of the sounds (cash
register, bomb explosion, camera clicks, etc.). The default sometimes
has a sound, so be sure to deselect it.

- Animate each bullet item, shape, or line,
according to your needs. Click Add Effect,
then select Start > On Click.
Usually it is best to select a fast speed.
- Select how the text comes in; usually it is
best to have the text come in all at once--by 1st level paragraphs (i.e.
each bullet item), but NOT by letter or word, unless this is a spelling or
vocabulary lesson!
.


- ALWAYS select AutoPreview and
Play to see how the selected timings and
effects are working.
- ALWAYS walk through the entire slide show
to see if the effects and transitions are appropriate. I usually spend
most of my editing time on this part after the content is all set.
For viewing on the web:
- The effect settings for teaching are
usually NOT appropriate for web viewing of slide shows. Imagine having
to click for each line or bullet to appear!!! I would quickly click
"end show". Web viewers like to peruse materials quickly and have
control over the pages that they view (navigation).
- For the above reasons, I recommend using
navigation or action buttons on slide shows.
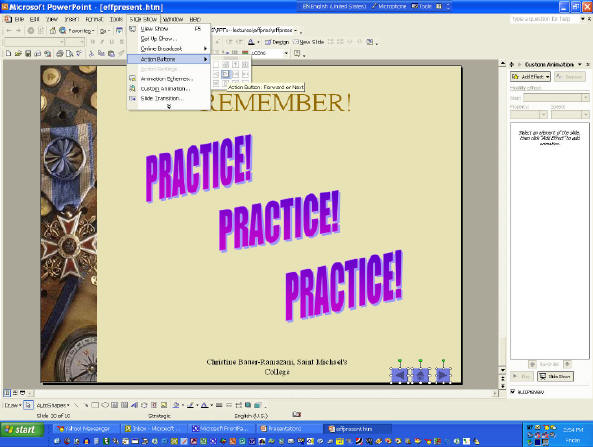
- Select Custom Animation > Action buttons
and choose the appropriate setting (Home,
Next, Previous). PowerPoint automatically links to the selected
slide.


- Copy and paste the 3 action buttons on each
page. Remember that the first and last slide should only have 2
buttons (Next OR Previous plus Home).
- ALWAYS select AutoPreview and
Play to see how the selected timings and
effects are working.
- ALWAYS walk through the entire slide show
to see if the effects and transitions are appropriate. I usually spend
most of my editing time on this part after the content is all set.
Converting
PPT files to HTML files for viewing on the web:
- I would strongly recommend converting
PowerPoint files from the default .ppt setting to .htm setting for viewing
on the web. Uploading a slide show to a web site can be a bit tricky.
- First, make sure your slide show is
completely finished in terms of content, formatting, navigation buttons,
custom animation, etc. before you upload it to the web.
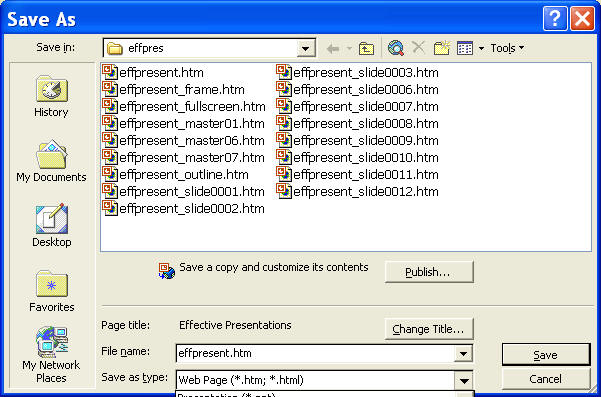
- Then convert it to htm by selecting
Save As type: web page.

- Go to your your web site and import the
file or folder where the slide show files are located. In FrontPage, a
file and folder are created, so you will need to import the
FOLDER.
- To link to the slide show, you have 2
options. I prefer the frame.htm file because it gives the viewer an
outline of the contents of the slide show on the left AND an option to click
the FULL SLIDE SHOW as well. Please note that the outline view will
not contain all of the animations that you created. However, the full
slide show will. To end the full slide show, right-click and select
"end show".
Please see some samples for teaching on
my web site for the Academic English course that accompanies an undergraduate
business course:
http://academics.smcvt.edu/cbauer-ramazani/cbr/AEP/ac_eng_BU113.htm
Please see some samples for web viewing
on my Professional Presentations web site:
http://academics.smcvt.edu/cbauer-ramazani/pres.htm
2.
Links to guides for
effective presentations:
3.
Guides to tips and tricks with PPT:
-
Microsoft Powerpoint
XP Quick
reference Guide Grover Center
<http://sts.jhu.edu/services/techserv/training/sheets/powerpointXP.pdf>
-
Using PowerPoint's Advanced Features (XP)-- created by Suzanne Czurylo,
Software Support, University of Michigan <http://www.bus.umich.edu/Technology/Training/Tips/Powerpoint/AdvancedPowerpointXP.pdf>
-
PowerPoint 2002
(1.4MB Word file)
<http://download.microsoft.com/download/f/b/f/fbfcb9c6-94a2-47f5-9d54-a5d4a7ff1b6f/powerpoint.doc>
Learn how create dynamic presentations with Microsoft
PowerPoint® 2002. This 31-page chapter
provides information that can
help you create unique and professional presentations, such as adding
preset or custom animation, sound, slide transitions, and inserting
pictures or a movie.
-
PPT 2002:
http://www.davis.k12.ut.us/district/etc/paul/powerpoint.html
--
PowerPoint Beginning, Control and Windows Keys, PowerPoint
Intermediate, Storyboarding with
PowerPoint, Drawing Toolbar, Drawing Toolbar
- Short Version, Reviewing and Collaborating in
PowerPoint
- In and Out of the
Classroom with PPT 2002:
http://www.microsoft.com/education/OfficeXPTutorial.aspx
- PPT 2002 Tour
:
http://www.microsoft.com/office/previous/powerpoint/2002tour/default.asp
- Views in PPT
:
http://office.microsoft.com/en-us/assistance/HA010348281033.aspx
- Using PrintPreview in PPT
:
http://office.microsoft.com/en-us/assistance/HA010348291033.aspx
- Free PowerPoint background templates,
tutorials, tips/tricks, sounds:
http://www.brainybetty.com/MENUPowerPoint.htm
4.
Printing out
handouts
That can be easily done in PRINT, but the default SLIDES
must be changed to HANDOUTS.
Then you have a choice of formats--6 slides and no note
space or 3 slides with note space. I also like to use the Notes Pages for
my presentations--I have the slide info PLUS my notes all on one sheet.
©
Christine Bauer-Ramazani
This page was last updated:
Wednesday, December 19, 2012


![]()


