GETTING STARTED WITH YAHOO!
GROUPS
Making a Group Site for your EV Online course
With these directions open, open a second browser window and go to
Yahoo! Groups at
http://groups.yahoo.com. This will let you refer to the directions as you fill
in the required information.
Getting a Yahoo!
ID
Creating your own group
Step 1 of 3:
Select a Yahoo! Groups Category
- Select the category
Schools &
Education and subgroup
Distance
Learning.
- Click on
Place my group here.
Step 2 of 3: Describe Your Group
- Decide on a name for your group. It's easiest to make it all one
word with no spaces. For example, if you are doing a course on
"Using the Internet to teach writing," you might call it
internetwriting.
You may also use two or more words, e.g.
Internet Writing.
Choose wisely, as this name will appear at the top of your group
page.
- Next, decide on the email address for your group. It is simplest
if you just use the name of your group for your email address. So in
the example above, just use
internetwriting
(Yahoo adds the tag,
@yahoogroups.com).
If you have spaces in your group's name, be sure to write the
e-mail address as one word or use underscoring, e.g.,
Internet_Writing.
- Next, type in a short description of your EVO session in the box
Describe your
Group. This description will also appear on your Group's
front page. Click
Continue
at the bottom of the page.
Step 3 of 3: Select your Yahoo! Profile and
Email Address
- Select the email address where you want to receive mail from
your Yahoo! Group. You
will also be asked to choose a
Profile
(some people have more than one for different purposes), or if you
do not have one yet, please click Create a
Profile and complete the information that you would like
others in your Yahoo! Group to know about you, e.g. your real
name, location, gender, occupation, hobbies, favorite quote, and
homepage if you have one. Finally,
type in the security word you see under Word
Verification at the bottom of the page (this is
to ensure a real person is setting up the group). Click
Continue
at the bottom of the page.
- You should now be on the page that says
Congratulations! Your group
xxx has been
created . You will want to click on
Customize Group
in order to continue setting it up. (If you want a little break at
this point, you can also edit your group later by going to its
address and clicking on
Management.
There is a related explanatory file in the
Setting up a YG Folder at our
group training site.)
- We suggest you don't invite members yet--explore your group a little
first. Or if you wish, click to invite your co-moderator or your mentor(s).
You will need their e-mail addresses.
Customizing Your Group
There is a nice explanatory page to get you started with the
"wizard." Click
Get Started, and don't worry, you can change things from the
Management area of your group
itself.
Step 1: Membership options
It is suggested that you customize your group to make it
unlisted, allow people to
join only with approval, and
allow only group members to post messages (private
discussion group).
Doing so
will prevent spammers from leaving
messages.
See the illustration below, using a hypothetical "testgroup05":
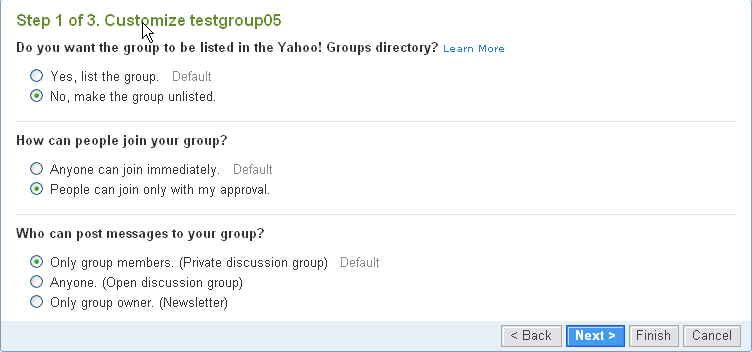
Click
Next
to continue.
Step 2: Messages and Features
See the illustration below for the settings we recommend:
messages delivered immediately (without approval by you),
all group
members receive messages, and all web features will be active.
Having messages delivered directly will help you manage the amount of
mail for the group. If you have dozens of messages to approve
each day, the discussion will bog down very quickly. If you receive spam, you, as
moderator, can delete it and ban the spammer. You will also want all
Web features available so that members can archive good resources,
files, and links.
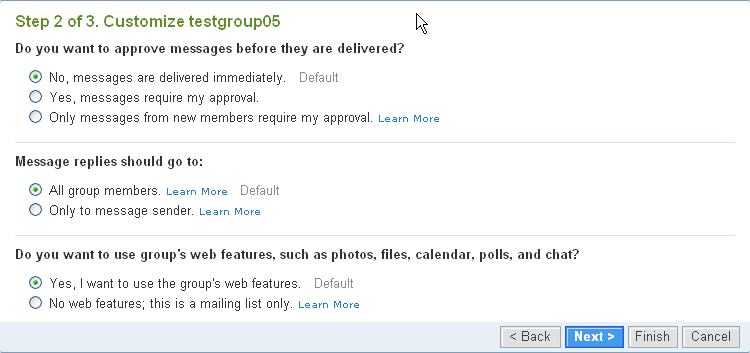
Click
[Next]
to continue.
Step 3: Privacy
Issues--message archives and web features
-
The next illustration shows the settings for who
the archives should be available to. We recommend that
only members
be allowed to view archives and access the web features of the
group. Thus, select "members" for all options.

-
Click
Finish
to continue.
-
You should now be at the second
Congratulations! page. Click on
Go to Group
to see how it looks. You can invite people from the
Members area there.
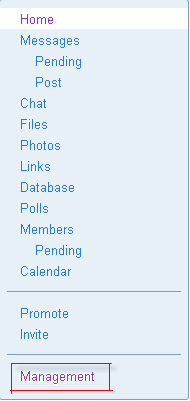
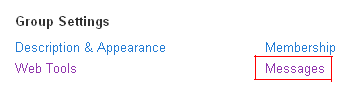
-
While at your Group, click on MANAGEMENT
(see illustration); then, under Group Settings,
click Messages.
On the Group Settings page, click
Edit to change
the Posting and Archives
options.
-
Select the Remove option
under Attachments. This will
allow only email messages without file attachments to be sent in
order to prevent viruses, porn, and
spam. Files can instead be uploaded to the
Files area in the Yahoo! Group.

Please refer to the
Settings tutorial on the Index page at
http://daf4.free.fr/settings/yg-index.htm for further
instructions on customizing your Yahoo! Group.
|